Grove-Temperature_Sensor

The Grove - Temperature Sensor uses a Thermistor to detect the ambient temperature. The resistance of a thermistor will increase when the ambient temperature decreases. It's this characteristic that we use to calculate the ambient temperature. The detectable range of this sensor is -40 - 125ºC, and the accuracy is ±1.5ºC.

Specifications
Voltage: 3.3 ~ 5V
Max power rating at 25℃: 300mW
Zero power resistance: 10 KΩ
Operating temperature range: -40 ~ +125 ℃
Demonstration
With Arduino
Here is an example to show you how to read temperature information from the sensor.
Connect the module to the Analog port 0 of Grove - Basic Shield using the 4-pin grove cable.
Plug the Grove - Basic Shield into Arduino.
Connect Arduino to PC by using a USB cable.

- Upload Code below. Please click here if you do not know how to upload.
/*
/* Grove - Temperature Sensor demo v1.0
* This sensor detects the environment temperature,
* Connect the signal of this sensor to A0, use the
* Serial monitor to get the result.
* By: https://www.seeedstudio.com
*/
#include <math.h>
int a;
float temperature;
int B=3975; //B value of the thermistor
float resistance;
void setup()
{
Serial.begin(9600);
}
void loop()
{
a=analogRead(0);
resistance=(float)(1023-a)*10000/a; //get the resistance of the sensor;
temperature=1/(log(resistance/10000)/B+1/298.15)-273.15;//convert to temperature via datasheet ;
delay(1000);
Serial.print("Current temperature is ");
Serial.println(temperature);
}
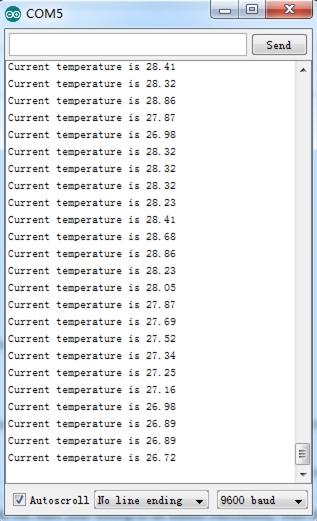
- You can check the readings via the Serial Monitor. The default unit is Celsius degree.
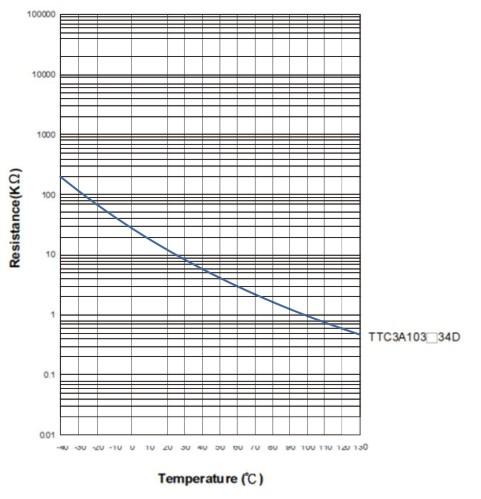
As a reference, the following is the resistance curve of TTC3A103*39H, the thermistor we used on this sensor. The higher the temperature goes, the smaller the resistance becomes.
With Raspberry Pi
1.You should have got a raspberry pi and a grovepi or grovepi+.
2.You should have completed configuring the development enviroment, otherwise follow here.
3.Connection
- Plug the sensor to grovepi socket D3 by using a grove cable.
4.Navigate to the demos' directory:
cd yourpath/GrovePi/Software/Python/
- To see the code
nano grove_temperature_sensor.py # "Ctrl+x" to exit #
import time
import grovepi

# Connect the Grove Temperature Sensor to analog port A0
# SIG,NC,VCC,GND
sensor = 0

while True:
try:
temp = grovepi.temp(sensor,'1.1')
print "temp =", temp
time.sleep(.5)

except KeyboardInterrupt:
break
except IOError:
print "Error"
5.Run the demo.
sudo python grove_temperature_sensor.py
With Beaglebone Green
To begin editing programs that live on BBG, you can use the Cloud9 IDE.
As a simple exercise to become familiar with Cloud9 IDE, creating a simple application to blink one of the 4 user programmable LEDs on the BeagleBone is a good start.
If this is your first time to use Cloud9 IDE, please follow this link.
Step1: Click the "+" in the top-right to create a new file.

Step2: Copy and paste the following code into the new tab
from Adafruit_I2C import Adafruit_I2C
import time

ADDR_ADC121 = 0x50

REG_ADDR_RESULT = 0x00
REG_ADDR_ALERT = 0x01
REG_ADDR_CONFIG = 0x02
REG_ADDR_LIMITL = 0x03
REG_ADDR_LIMITH = 0x04
REG_ADDR_HYST = 0x05
REG_ADDR_CONVL = 0x06
REG_ADDR_CONVH = 0x07

i2c = Adafruit_I2C(ADDR_ADC121)

class I2cAdc:
def __init__(self):
i2c.write8(REG_ADDR_CONFIG, 0x20)

def read_adc(self):
"Read ADC data 0-4095."
data_list = i2c.readList(REG_ADDR_RESULT, 2)
        #print 'data list', data_list
data = ((data_list[0] & 0x0f) << 8 | data_list[1]) & 0xfff
return data

if __name__ == '__main__':
    # Connect the Grove - I2C ADC to I2C Grove port of Beaglebone Green.
adc = I2cAdc()
while True:
print 'sensor value ', adc.read_adc()
time.sleep(.2)
Step3: Save the file by clicking the disk icon with a name "grove_i2c_adc.py".
Step4: Create a new file Copy the following code into the new tab and save it with the .py extension.
import time
import math
import grove_i2c_adc
import Adafruit_BBIO.GPIO as GPIO

BUZZER = "P9_22"            # GPIO P9_22
GPIO.setup(BUZZER, GPIO.OUT)

# The threshold to turn the buzzer on 28 Celsius
THRESHOLD_TEMPERATURE = 28

adc = grove_i2c_adc.I2cAdc()

#   The argument in the read_temperature() method defines which Grove board(Grove Temperature Sensor) version you have connected.
#   Defaults to 'v1.2'. eg.
#       temp = read_temperature('v1.0')          # B value = 3975
#       temp = read_temperature('v1.1')          # B value = 4250
#       temp = read_temperature('v1.2')          # B value = 4250
def read_temperature(model = 'v1.2'):
"Read temperature values in Celsius from Grove Temperature Sensor"
    # each of the sensor revisions use different thermistors, each with their own B value constant
if model == 'v1.2':
bValue = 4250  # sensor v1.2 uses thermistor ??? (assuming NCP18WF104F03RC until SeeedStudio clarifies)
elif model == 'v1.1':
bValue = 4250  # sensor v1.1 uses thermistor NCP18WF104F03RC
else:
bValue = 3975  # sensor v1.0 uses thermistor TTC3A103*39H

total_value = 0
for index in range(20):
sensor_value = adc.read_adc()
total_value += sensor_value
time.sleep(0.05)
average_value = float(total_value / 20)

    # Transform the ADC data into the data of Arduino platform.
sensor_value_tmp = (float)(average_value / 4095 * 2.95 * 2 / 3.3 * 1023)
resistance = (float)(1023 - sensor_value_tmp) * 10000 / sensor_value_tmp
temperature = round((float)(1 / (math.log(resistance / 10000) / bValue + 1 / 298.15) - 273.15), 2)
return temperature

# Function: If the temperature sensor senses the temperature that is up to the threshold you set in the code, the buzzer is ringing for 1s.
# Hardware: Grove - I2C ADC, Grove - Temperature Sensor, Grove - Buzzer
# Note: Use P9_22(UART2_RXD) as GPIO.
# Connect the Grove Buzzer to UART Grove port of Beaglebone Green.
# Connect the Grove - I2C ADC to I2C Grove port of Beaglebone Green, and then connect the Grove - Temperature Sensor to Grove - I2C ADC.
if __name__ == '__main__':

while True:
try:
            # Read temperature values in Celsius from Grove Temperature Sensor
temperature = read_temperature('v1.2')

            # When the temperature reached predetermined value, buzzer is ringing.

print "temperature = ", temperature

except IOError:
print "Error"
Step5: Connect Grove Temperature to Grove I2C ADC which is connected to Grove I2C socket on BBG.
Step6: Run the code. You'll find that the terminal outputs Temperature value every 2 seconds.
Schematic Online Viewer
Resource
Projects
The Environment Cube! Know the Land Beneath You using Sigfox: A cube with all the necessary sensors, suitable for a wide range of applications like agriculture, monitoring, ,etc.
Tech Support
Please submit any technical issue into our forum.
