Getting Started with OpenWRT
OpenWrt is an open-source Linux operating system which runs on embedded devices/ routers. It offers more features, performance and security than a traditional router. It has a filesystem that’s fully writable and includes a package management system. You can make use of these packages to suit your applications in various ways.
By using OpenWrt you can have various features such as:
- Increase overall network performance when multiple devices are connected
- Share files between devices via an external storage drive connected directly to the router
- Increase network security
- Run a BitTorrent client from the router
- Connect a printer directly to the router to create a networked printer
- Limit bandwidth usage of a particular device in the network
- Active queue management
- Real time network monitoring
- Create Dynamic DNS
- Set Up a VPN client or server
Now let's dive into using OpenWrt on Dual Gigabit Ethernet Carrier Board for Raspberry Pi CM4 and ODYSSEY - X86J4125.
Note: This guide works for ODYSSEY - X86J4105 as well.
Hardware Required
You need to prepare the following hardware before getting started with OpenWRT on Dual Gigabit Ethernet Carrier Board for Raspberry Pi CM4 and ODYSSEY - X86J4125
- 1 x Dual Gigabit Ethernet Carrier Board for Raspberry Pi CM4
- 1 x Power adapter (5V/3A) with USB Type-C cable
- 1 x ODYSSEY - X86J4125 with the included power adapter
- 2 x Ethernet cables
Initial Set Up
Dual Gigabit Ethernet Carrier Board for Raspberry Pi CM4
First we will explain how to install and set up OpenWrt on Dual Gigabit Ethernet Carrier Board for Raspberry Pi CM4
Flash OpenWrt Image
Now we need to flash OpenWrt image on to the eMMC storage of the board so that it can run on the Raspberry Pi Compute Module 4. Once the necessary drivers are installed, you just have to connect the USB Type-C port of the CM4 in to your PC, and it will show as an external drive. Follow the steps below according to your operating system.
For Windows
- Step 1. Download the latest OpenWrt Image compiled by Seeed for this board from here
Note: Choose openwrt-bcm27xx-bcm2711-rpi-4-ext4-factory.img.gz file
Step 2. Download and run this installer to install the necessary drivers and the boot tool
Step 3. Search for rpiboot tool that we installed and open it
Step 4. Connect a jumper wire between Boot and GND pins as follows to enable the BOOT mode

- Step 5. Connect Carrier Board to the PC via USB Type-C cable
Windows will now find the hardware and install the necessary drivers
Step 6. Open file explorer and you will see the eMMC of the Computer Module 4 shown as a USB mass storage device
Step 7. Download balenaEtcher software by visiting this link according to your operating system
Step 8. Run balenaEtcher as administrator

Step 9. Click Flash from file and point to the OpenWrt image file that you downloaded before
Step 10. Click Select target and select the connected eMMC drive
Step 11. Finally, click Flash!

Please wait a few minutes until the flashing process is complete.
For Mac/Linux
- Step 1. Download the latest OpenWrt Image compiled by Seeed for this board from here
Note: Choose openwrt-bcm27xx-bcm2711-rpi-4-ext4-factory.img.gz file
- Step 2. Open a Terminal window and type the following to update the packages list
sudo apt update
- Step 3. Install Git by the following command
sudo apt install git
- Step 4. Git might produce an error if the date is not set properly. Type the following to correct this
sudo date MMDDhhmm
NOTE: Where MM is the month, DD is the date, and hh and mm are hours and minutes respectively.
- Step 5. Clone the usbboot tool repository
git clone --depth=1 https://github.com/raspberrypi/usbboot
cd usbboot
- Step 6. Enter the following to install libusb
sudo apt install libusb-1.0-0-dev
- Step 7. Build and install the usbboot tool
make
- Step 8. Run the usbboot tool and it will wait for a connection
sudo ./rpiboot
- Step 9. Connect a jumper wire between Boot and GND pins as follows to enable the programming mode
Step 10. Connect Carrier Board to the PC via USB Type-C cable
Step 11. Download balenaEtcher software by visiting this link according to your operating system
Step 12. Run balenaEtcher as administrator
Step 13. Click Flash from file and point to the OpenWrt image file that you downloaded before
Step 14. Click Select target and select the connected eMMC drive
Step 15. Finally, click Flash!
Please wait a few minutes until the flashing process is complete.
Dual Gigabit Ethernet Ports Connection
Once OpenWrt is finished flashing onto Dual Gigabit Ethernet Carrier Board for Raspberry Pi CM4, you can connect Ethernet cables to the board as follows:
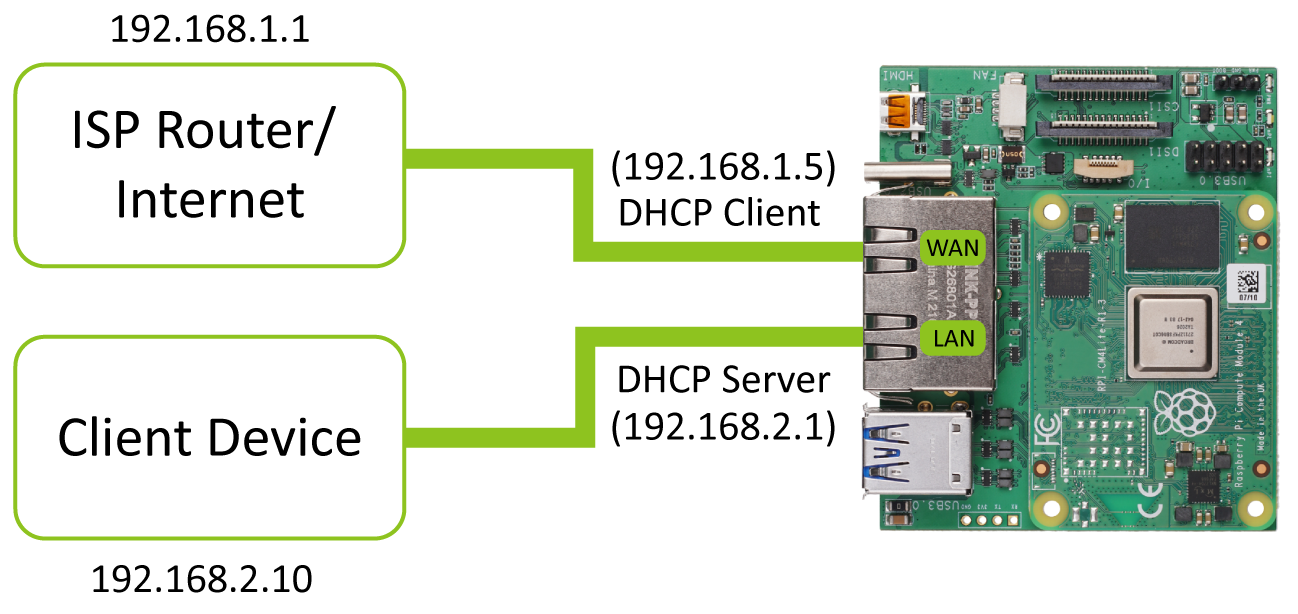
The OpenWrt image has already included the necessary network configurations for the dual Gigabit ports to work out-of-the-box, so that you don't have to configure them by yourself. However, here is an explanation of how the 2 ports are configured.
One port is configured as a LAN interface and the other as a WAN interface. The WAN interface is the one which can be connected to the internet and it is configured as a DHCP client. On the other hand, the LAN interface is the one which can be connected to the client devices and it is configured as a DHCP server.
Here the LAN interface is configured so that it has a static IP address of 192.168.2.1. However, if you connect this OpenWrt router to another router with default gateway IP of 192.168.2.1, you might want to change the IP address on the LAN interface or otherwise OpenWrt will have IP conflict. Please follow the FAQ below to learn more!
ODYSSEY - X86J4125
Next we will explain how to install and set up OpenWrt on ODYSSEY - X86J4125
Flash OpenWrt Image
Now we need to install OpenWrt on to the eMMC/ HDD/ SSD of the ODYSSEY - X86J4125 so that it can run on the board. To do this, we first need to create a bootable USB with the OpenWrt image. Follow the steps below
- Step 1. Download the latest OpenWrt Image compiled by Seeed for this board from here
Note: Choose openwrt-x86-64-generic-ext4-combined-efi.img.gz file
Step 2. Insert a USB drive to the PC
Step 3. Download balenaEtcher software by visiting this link according to your operating system
Step 4. Run balenaEtcher as administrator
Step 5. Click Flash from file and point to the OpenWrt image file that you downloaded before
Step 6. Click Select target and select the connected USB drive
Step 7. Finally, click Flash!
Please wait a few minutes until the flashing process is complete.
Dual Gigabit Ethernet Ports Connection
Once OpenWrt is finished flashing onto the USB drive, you can connect Ethernet cables to the board as follows:

The OpenWrt image has already included the necessary network configurations for the dual Gigabit ports to work out-of-the-box, so that you don't have to configure them by yourself. However, here is an explanation of how the 2 ports are configured.
One port is configured as a LAN interface and the other as a WAN interface. The WAN interface is the one which can be connected to the internet and it is configured as a DHCP client. On the other hand, the LAN interface is the one which can be connected to the client devices and it is configured as a DHCP server.
Here the LAN interface is configured so that it has a static IP address of 192.168.2.1. However, if you connect this OpenWrt router to another router with default gateway IP of 192.168.2.1, you might want to change the IP address on the LAN interface or otherwise OpenWrt will have IP conflict. Please follow the FAQ below to learn more!
Install OpenWrt
Now that we have created a bootable USB drive previously, let's move on to installing OpenWrt to ODYSSEY - X86J4125
Step 1. Insert the bootable USB drive to the ODYSSEY board and connect the board to a display and a keyboard
Step 2. Turn on the board and keep pressing F7 to enter the boot manager screen
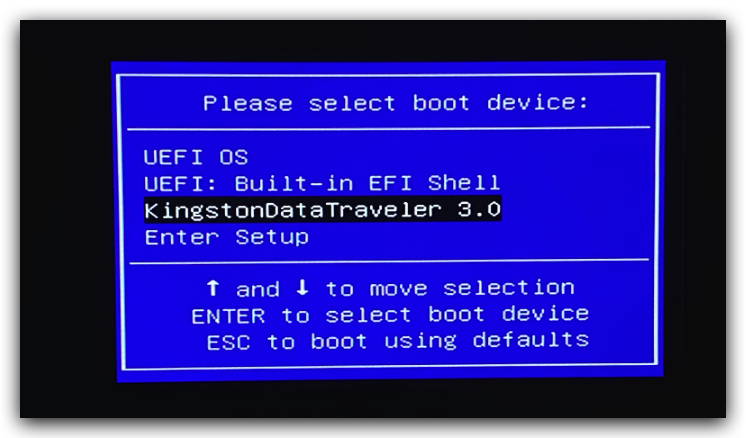
- Step 3. Select the bootable USB and press ENTER
Now OpenWrt will start to run live from the USB drive.
Step 4. Turn on the board, open a web browser and type 192.168.2.1 in the search bar
Step 5. Once OpenWrt portal opens, navigate to System > FileTransfer
Step 6. Click Choose File under Upload and select the OpenWrt image that we downloaded before
Note: Make sure the .gz file is extracted to the .img file before
- Step 7. Click Upload

Now the image is saved under /tmp/upload/ directory
Step 8. Navigate to System > TTYD Terminal and login with root as the username
Step 9. Type lsblk to list the connected storage devices

- Step 10. Type the following to flash the OpenWrt image to the storage device connected (eMMC/ HDD/ SSD)
dd if=/tmp/upload/openwrt-x86-64-generic-ext4-combined-efi.img of=/dev/sda
Note: /dev/sda correponds to the storage device connected
- Step 11. Once it's finished flashing to the storage device, reboot the board, remove the USB drive and it will start to boot OpenWrt from the connected storage device.
Run OpenWrt
Now that we have finished setting up the OpenWrt software and the dual Gigabit Ethernet ports, we will move on to running OpenWrt on Dual Gigabit Ethernet Carrier Board for Raspberry Pi CM4 and ODYSSEY - X86J4125. This section will not be divided according to the 2 boards because both will have the same OpenWrt functionality along with the same web-interface.
Once the ethernet cables are connected as before and the OpenWrt image is flashed, proceed to the steps below
Step 1. Power on the board
Step 2. Open a web browser and type 192.168.2.1
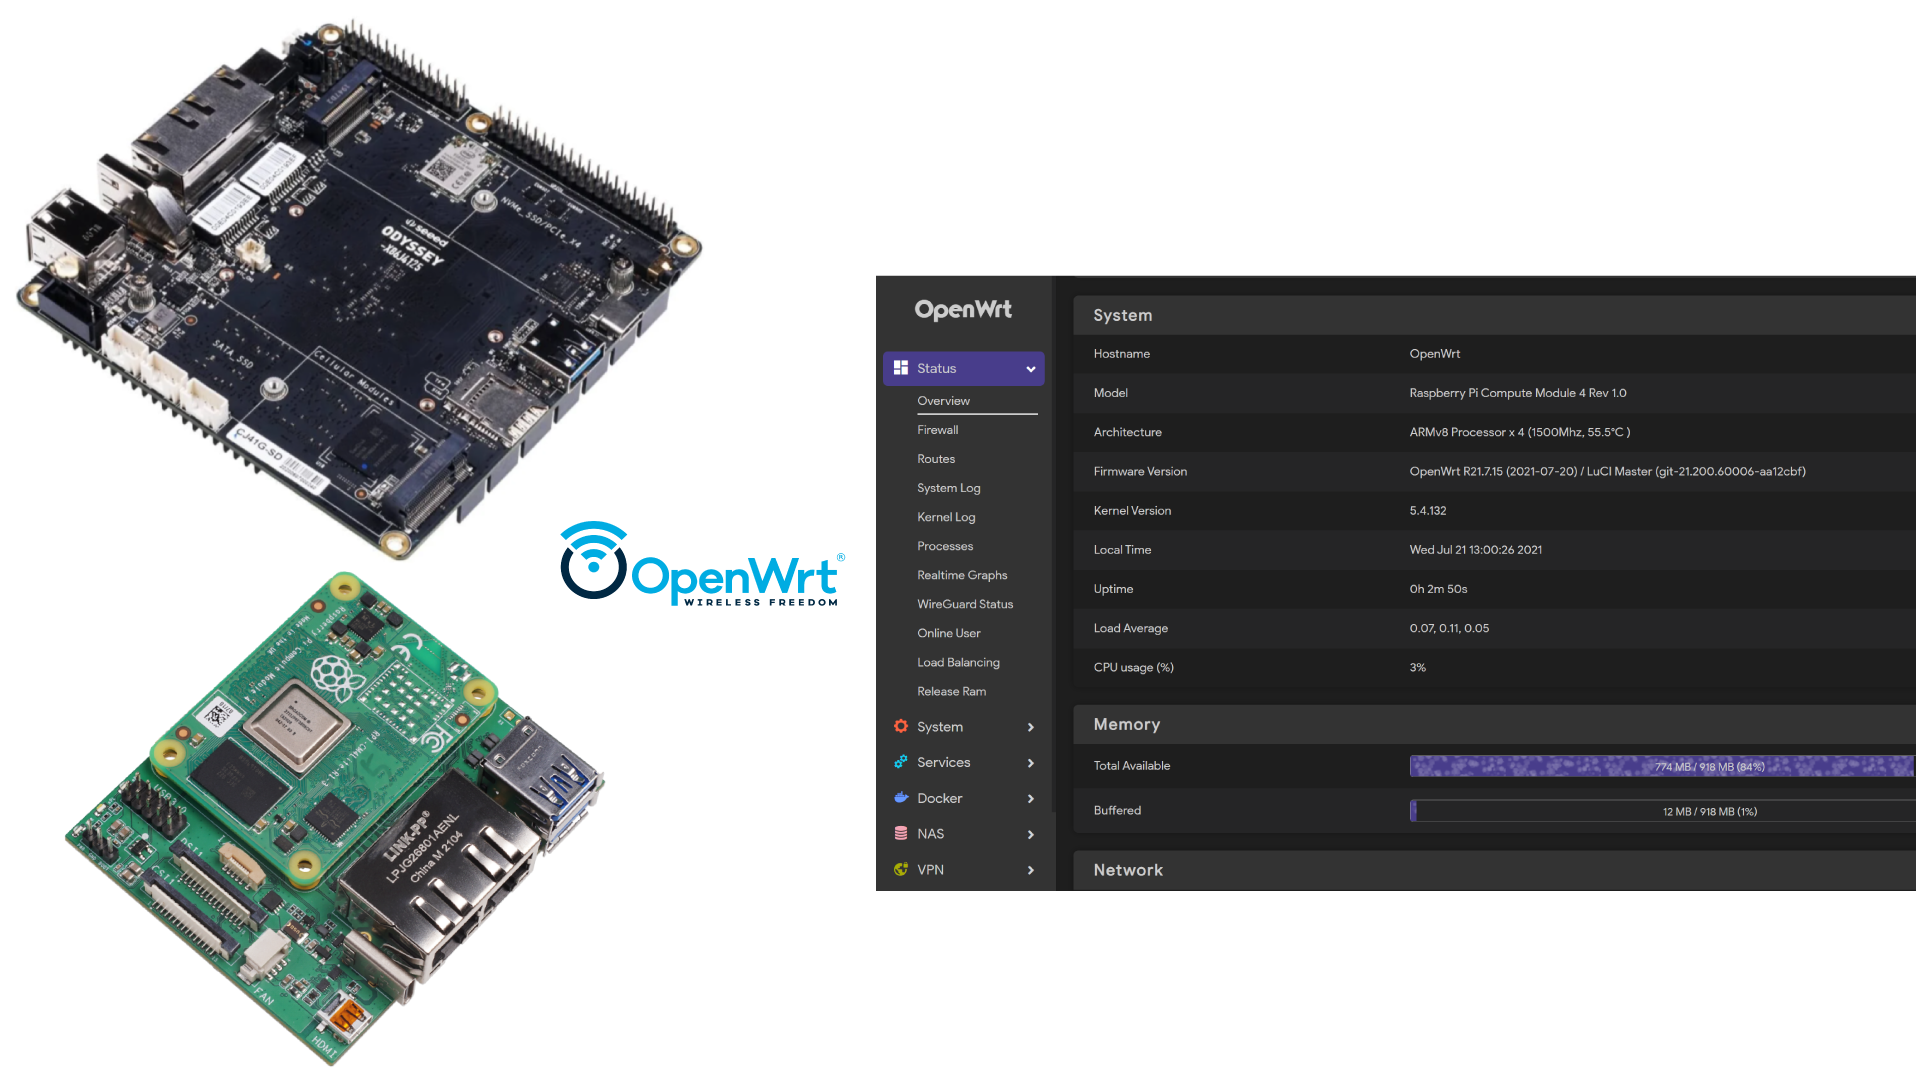
You will see the OpenWrt Luci web-interface here. The OpenWrt image compiled by Seeed is included with many packages out-of-the-box. So you can use these package to realize many applications!

Network Speed Test
Finally we will move on to testing the network speeds on the Dual Gigabit Ethernet Carrier Board for Raspberry Pi CM4 and ODYSSEY - X86J4125 with OpenWrt installed.
Dual Gigabit Board as a Server and ODYSSEY as a Client
We will first use Dual Gigabit Ethernet Carrier Board as a server and ODYSSEY - X86J4125 as a client for the network test
Note: Make sure to change the IP address of the LAN interface on the ODYSSEY board to 192.168.3.1 by following this
- Step 1. Connect the boards as follows

- Step 2. Open a web browser and log in to both the boards and enter the terminal as follows:
Dual Gigabit Ethernet Carrier Board
Type 192.168.2.1 on the web browser search box
Navigate to System > TTYD Terminal and login with root as the username
ODYSSEY - X86J4125/ X86J4105
Type 192.168.3.1 on the web browser search box
Navigate to System > TTYD Terminal and login with root as the username
Note: Make sure both devices are not on the same IP range on the LAN interface
- Step 3. Install iperf3 network performance test tool on both devices
opkg update
opkg install iperf3
- Step 4. On the TTYD Terminal window of Dual Gigabit Ethernet Carrier Board, type the following to start iperf3 as a server
iperf3 -s
- Step 5. On the TTYD Terminal window of ODYSSEY - X86J4125, type the following to start iperf3 as a client and connect to the server created before
iperf3 -c 192.168.2.1
Note: Here the IP address of the Dual Gigabit Board server is written
Now you will see the network speed test results as follows

Note: Here you can see the speed is close to 1Gbps
ODYSSEY as a Server and Dual Gigabit Board as a Client
We will now use ODYSSEY - X86J4125 as a server and Dual Gigabit Ethernet Carrier Board as a client for the network test
- Step 1. Connect the boards as follows

- Step 2. On the TTYD Terminal window of ODYSSEY - X86J4125, type the following to start iperf3 as a server
iperf3 -s
- Step 3. On the TTYD Terminal window of Dual Gigabit Ethernet Carrier Board, type the following to start iperf3 as a client and connect to the server created before
iperf3 -c 192.168.3.1
Note: Here the IP address of the ODYSSEY-X86 server is written
Now you will see the network speed test results as follows

Note: Here you can see the speed is close to 1Gbps
FAQ
Q1: What if I connect the OpenWrt router to my existing router which has a default gateway IP of 192.168.2.1?
Seeed OpenWrt image comes preconfigured with the necessary network settings. You might only need to change one network setting for the scenario which involves the Dual Gigabit Ethernet Carrier Board for Raspberry Pi CM4 or ODYSSEY - X86J4125 connecting to your existing router, and the router has the default gateway IP set to 192.168.2.1 which is the same as the default gateway IP for OpenWrt. In this scenario, you need to change the default IP of LAN interface on OpenWrt as follows:
Step 1. Open a web browser and log in to the OpenWrt portal by typing 192.168.2.1
Step 2. Navigate to System > TTYD Terminal and login with root as the username
Step 3. Open the following file
vi /etc/config/network
- Step 4. Change the static IP address on the LAN interface as follows
config interface 'lan'
        option type 'bridge'
        option ifname 'eth0'
        option proto 'static'
        option ipaddr '192.168.3.1'
        option netmask '255.255.255.0'
        option ip6assign '60'
Note: Here the static IP is changhed to 192.168.3.1. However, you can type any IP address of your choice
- Step 4. Reboot the router
reboot
Q2: What if I have the Dual Gigabit Ethernet Carrier Board non-CM4 version and attach a CM4 without emmC?
If you want to use a Compute Module 4 without eMMC on the Dual Gigabit Ethernet Carrier Board, then you need to flash OpenWrt on to a micro-SD card and insert it into the board. Follow the steps below according to your operating system.
Step 1. Insert a micro-SD card to the computer using a micro-SD card reader connected to the computer, or by using a built-in card reader on a laptop
Step 2. Download balenaEtcher software by visiting this link according to your operating system
Step 3. Run balenaEtcher as administrator
Step 4. Click Flash from file and point to the OpenWrt image file that you downloaded before
Step 5. Click Select target and select the connected micro-SD card
Step 6. Finally, click Flash!
Please wait a few minutes until the flashing process is complete.
- Step 7. Eject the micro-SD card from computer and insert it into the Dual Gigabit Ethernet Carrier Board

Q3: I cannot successfully set up Rclone from web UI
Rclone is a program to manage files on cloud storage drives. You can use it to make sure your cloud files are always in sync with the local storage.
Eventhough there is a UI to configure Rclone within OpenWrt Luci interface, you need to first do all the configurations within a command line. After that only you will be able to view your files by using the web UI.
Please follow the steps below:
Step 1. Visit OpenWrt Luci web UI and navigate to
Services > TerminalStep 2. Log in with your OpenWrt credentials
Step 3. Start the rclone configuration process by typing the following
rclone config
Step 4. Press n and press Enter to create a new remote.
Step 5. Type a name of your choice for the new remote

- Step 6. Find the type of storage you are creating a remote connection to, and enter the corresponding number from the long list

Note: Here number 13 is chosen for Google Drive as an example
Step 7. When you are prompted for a Client ID, press Enter to accept the default
Step 8. When you are prompted for a Client Secret, press Enter to accept the default
Step 9. Choose 1 as the scope that rclone should use when requesting access from the drive

Note: This will give full access to all the files in the drive
Step 10. When you are prompted for root folder ID, press Enter to accept the default
Step 11. When you are prompted for service account credentials JSON file path, press Enter to accept the default
Step 12. On Edit advanced config prompt, press Enter which selects No by default
Step 13. On Use auto config menu, press n and then press Enter
Step 14. Copy and paste the link shown on a web browser

Step 15. Sign in to your Google account and Allow access
Step 16. Copy the code shown on the Google sign in page and paste it inside the command line that we used before
Step 17. On Configure as a team drive press Enter to accept the default
Step 18. Press Enter to confirm the creation of the remote
You will see the output as follows:

Step 19. Type q to quit the configuration
Step 20. Navigate to
NAS > Rclone, check the box next to run Rclone as daemon and click SAVE & APPLYStep 21. Copy the rclone address

Step 22. Click WEBUI REACT and a new web page will open
Step 23. Paste the previously copied rclone address on to the first blank column
Step 24. Type admin for both username and password, and press Verify
You will see the following output if the connection is verified
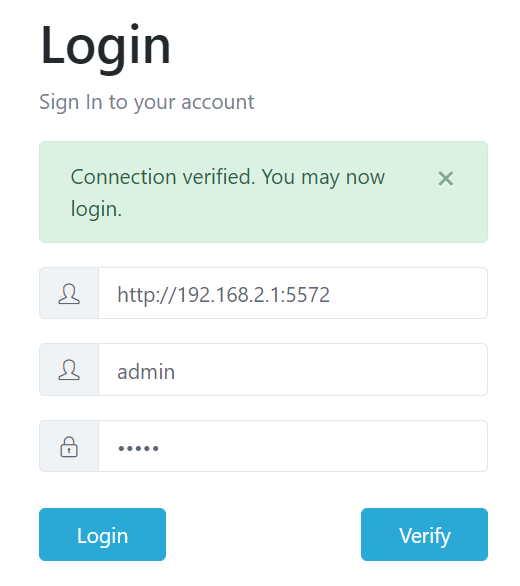
Step 25. Click Login and go to Explore from the side menu
Step 26. Type the name of the remote we created before and click Open

Now you will see all your files in available in your drive
Resources
[Web Page] OpenWrt Offficial Documentation
[GitHub] Seeed OpenWrt
[OneDrive] Seeed OpenWrt Images
Tech Support
Please submit any technical issue into our forum.
