Grove - 6-Position DIP Switch
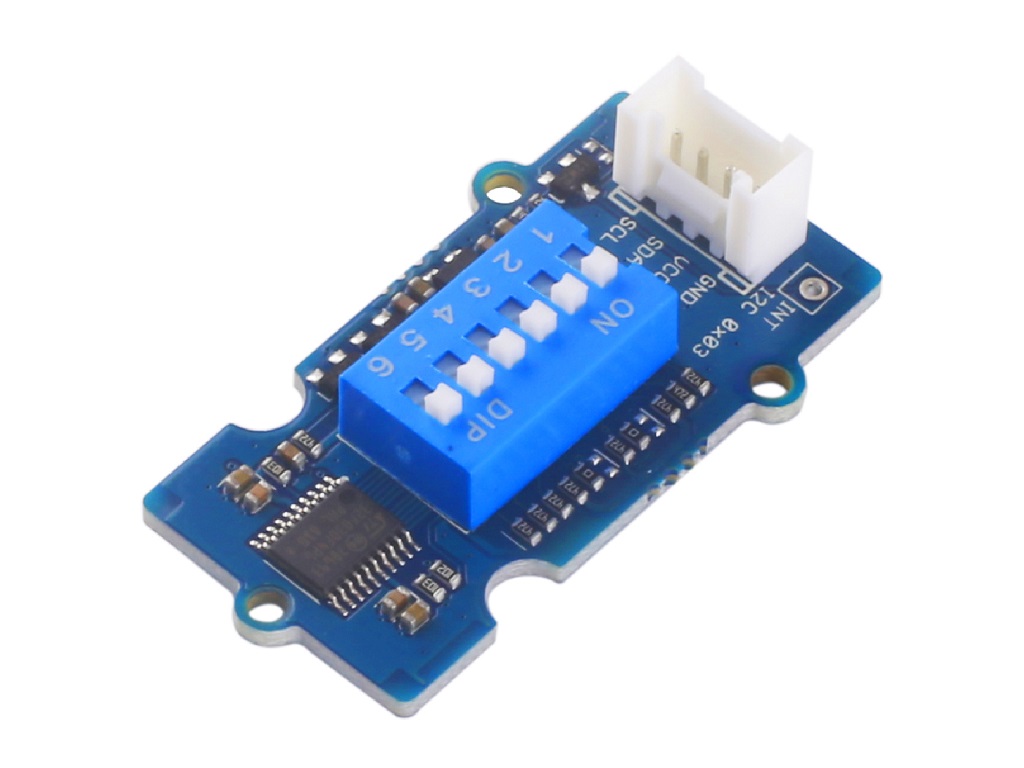
The Grove - 6-Position DIP Switch has 6 individual switch positions, which use I2C to transmit date. It works great as a multi-channel control switches.

Version
| Product Version | Changes | Released Date |
|---|---|---|
| Grove - 6-Position DIP Switch | Initial | Jun 2018 |
Features
- 6 individual switch
- Good heat resistance
- Long operating Life
- Grove compatible
Specification
| Item | Value |
|---|---|
| Operating voltage | 3.3V / 5V |
| Interface | I2C |
| Default I2C Address | 0x03 |
| Size | L: 40mm W: 20mm H: 13mm |
| Weight | 5g |
| Package size | L: 140mm W: 90mm H: 10mm |
| Gross Weight | 11g |
Applications
- Multifunction control
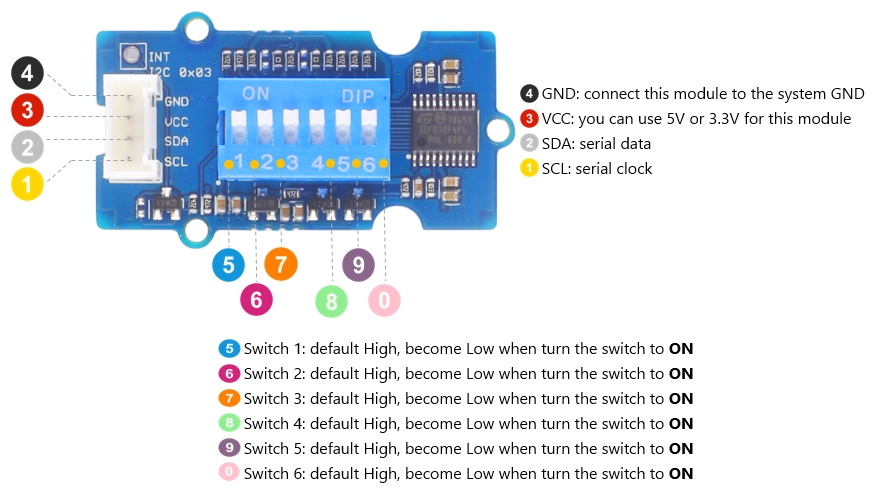
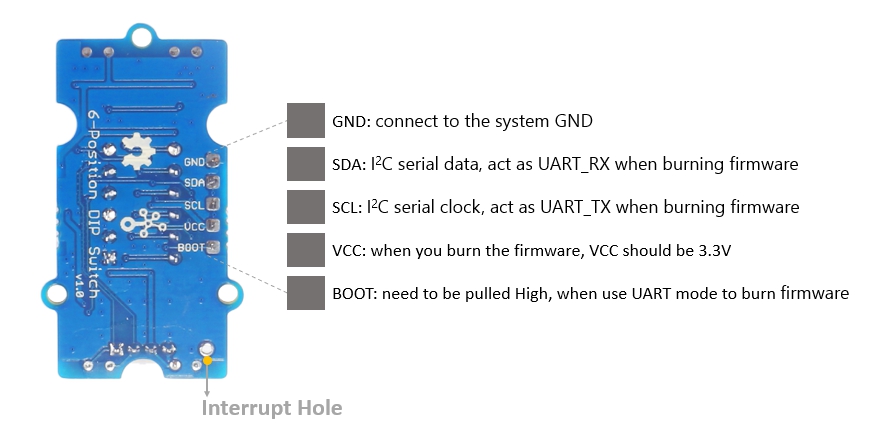
Hardware Overview
Pin Map
Platforms Supported
| Arduino | Raspberry Pi | |||
|---|---|---|---|---|
The platforms mentioned above as supported is/are an indication of the module's software or theoritical compatibility. We only provide software library or code examples for Arduino platform in most cases. It is not possible to provide software library / demo code for all possible MCU platforms. Hence, users have to write their own software library.
Getting Started
Play With Arduino
Hardware
Materials required
| Seeeduino V4.2 | Base Shield | Grove - 6-Position DIP Switch |
|---|---|---|
 |  |  |
| Get One Now | Get One Now | Get One Now |
1 Please plug the USB cable gently, otherwise you may damage the port. Please use the USB cable with 4 wires inside, the 2 wires cable can't transfer data. If you are not sure about the wire you have, you can click here to buy
2 Each Grove module comes with a Grove cable when you buy. In case you lose the Grove cable, you can click here to buy.
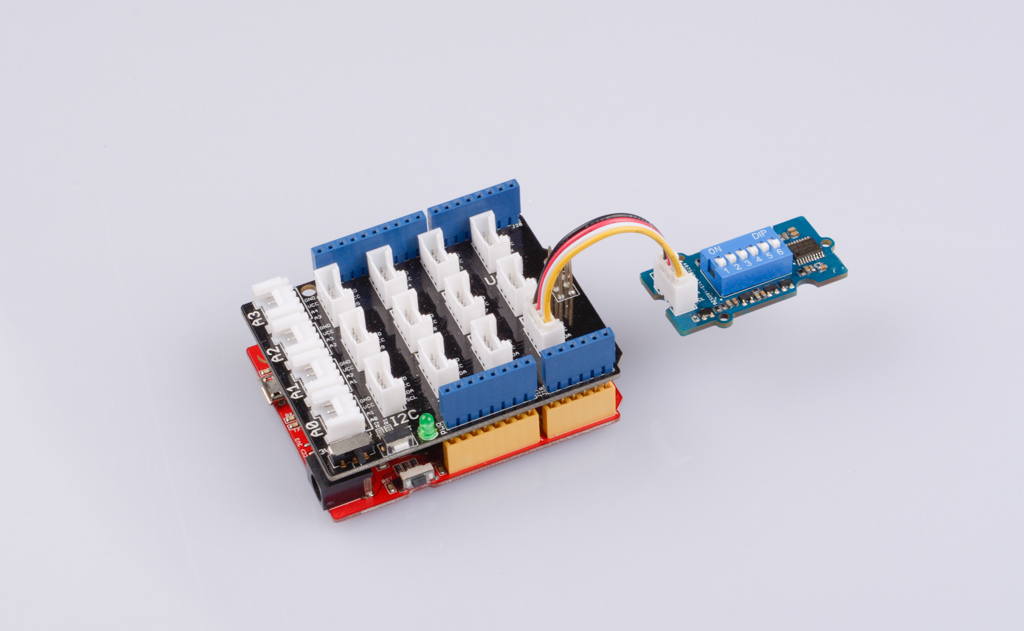
Step 1. Connect the Grove - 6-Position DIP Switch to the I2C port of the Base Shield.
Step 2. Plug Grove - Base Shield into Seeeduino.
Step 3. Connect Seeeduino to PC via a USB cable.
If we don't have Grove Base Shield, We also can directly connect this module to Seeeduino as below.
| Seeeduino | Grove - 6-Position DIP Switch |
|---|---|
| 5V | Red |
| GND | Black |
| SDA | White |
| SCL | Yellow |
Software
If this is the first time you work with Arduino, we strongly recommend you to see Getting Started with Arduino before the start.
Step 1. Download the Grove Multi Switch Library from Github.
Step 2. Refer to How to install library to install library for Arduino.
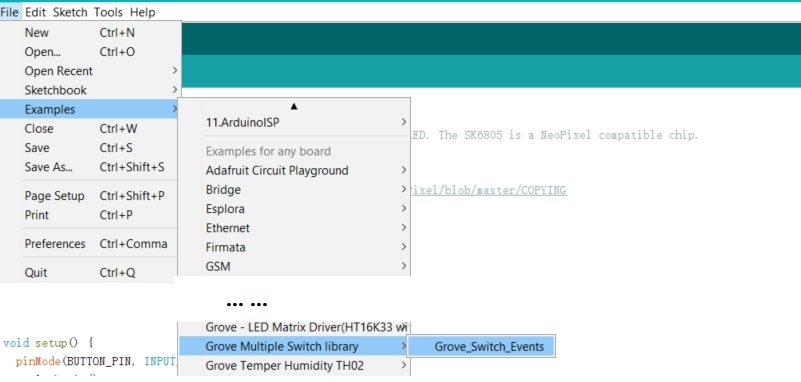
Step 3. Restart the Arduino IDE. Open example via the path: File --> Examples --> Grove Multi Switch Library --> Grove_Switch_Events.
Or, you can just click the icon  in upper right corner of the code block to copy the following code into a new sketch in the Arduino IDE.
#include "Grove_Multi_Switch.h"

GroveMultiSwitch mswitch[1];
const char* grove_5way_tactile_keys[] = {
 "KEY A",
 "KEY B",
 "KEY C",
 "KEY D",
 "KEY E",
};
const char* grove_6pos_dip_switch_keys[] = {
 "POS 1",
 "POS 2",
 "POS 3",
 "POS 4",
 "POS 5",
 "POS 6",
};

const char** key_names;

int deviceDetect(void) {
 if (!mswitch->begin()) {
  Serial.println("***** Device probe failed *****");
  return -1;
 }

 Serial.println("***** Device probe OK *****");
 if (PID_VAL(mswitch->getDevID()) == PID_5_WAY_TACTILE_SWITCH) {
  Serial.println("Grove 5-Way Tactile Switch Inserted!");
  key_names = grove_5way_tactile_keys;
 } else if (PID_VAL(mswitch->getDevID()) == PID_6_POS_DIP_SWITCH) {
  Serial.println("Grove 6-Position DIP Switch Inserted!");
  key_names = grove_6pos_dip_switch_keys;
 }

 // enable event detection
 mswitch->setEventMode(true);

 // report device model
 Serial.print("A ");
 Serial.print(mswitch->getSwitchCount());
 Serial.print(" Button/Switch Device ");
 Serial.println(mswitch->getDevVer());
 return 0;
}

void setup()
{
 Serial.begin(115200);
 Serial.println("Grove Multi Switch");

 // Initial device probe
 if (deviceDetect() < 0) {
  Serial.println("Insert Grove 5-Way Tactile");
  Serial.println("or Grove 6-Position DIP Switch");
  for (;;);
 }

 return;
}

void loop()
{
 GroveMultiSwitch::ButtonEvent_t* evt;

 delay(1);

 evt = mswitch->getEvent();
 if (!evt) {
  // dynamic device probe
  deviceDetect();
  delay(1000);
  return;
 }

 if (!(evt->event & GroveMultiSwitch::BTN_EV_HAS_EVENT)) {
  #if 0
  Serial.print("No event, errno = ");
  Serial.println(mswitch->errno);
  #endif
  return;
 }

 for (int i = 0; i < mswitch->getSwitchCount(); i++) {
  Serial.print(key_names[i]);
  Serial.print(": RAW - ");
  Serial.print((evt->button[i] & GroveMultiSwitch::BTN_EV_RAW_STATUS)?
               "HIGH ": "LOW ");
  if (PID_VAL(mswitch->getDevID()) == PID_5_WAY_TACTILE_SWITCH) {
   Serial.print((evt->button[i] & GroveMultiSwitch::BTN_EV_RAW_STATUS)?
                "RELEASED ": "PRESSED ");
  } else if (PID_VAL(mswitch->getDevID()) == PID_6_POS_DIP_SWITCH) {
   Serial.print((evt->button[i] & GroveMultiSwitch::BTN_EV_RAW_STATUS)?
                "OFF ": "ON ");
  }
  Serial.println("");
 }

 for (int i = 0; i < mswitch->getSwitchCount(); i++) {
  if (evt->button[i] & ~GroveMultiSwitch::BTN_EV_RAW_STATUS) {
   Serial.println("");
   Serial.print(key_names[i]);
   Serial.print(": EVENT - ");
  }
  if (evt->button[i] & GroveMultiSwitch::BTN_EV_SINGLE_CLICK) {
   Serial.print("SINGLE-CLICK ");
  }
  if (evt->button[i] & GroveMultiSwitch::BTN_EV_DOUBLE_CLICK) {
   Serial.print("DOUBLE-CLICK ");
  }
  if (evt->button[i] & GroveMultiSwitch::BTN_EV_LONG_PRESS) {
   Serial.print("LONG-PRESS ");
  }
  if (evt->button[i] & GroveMultiSwitch::BTN_EV_LEVEL_CHANGED) {
   Serial.print("LEVEL-CHANGED ");
  }
 }
 Serial.println("");
}
Step 4. Upload the demo. If you do not know how to upload the code, please check How to upload code.
Step 5. Open the Serial Monitor of Arduino IDE by click Tool-> Serial Monitor. Or tap the
ctrl+shift+mkey at the same time. Set the baud rate to 115200.
If every thing goes well, you will get the result. For instance, the default switch is off-High, when you turn the Switch6 to ON, the output will be POS 6: RAW - LOW ON.
Grove Multi Switch
***** Device probe OK *****
Grove 6-Position DIP Switch Inserted!
A 6 Button/Switch Device BN-6--0.1
POS 1: RAW - HIGH OFF
POS 2: RAW - HIGH OFF
POS 3: RAW - HIGH OFF
POS 4: RAW - HIGH OFF
POS 5: RAW - HIGH OFF
POS 6: RAW - LOW ON

POS 6: EVENT - LEVEL-CHANGED
POS 1: RAW - LOW ON
POS 2: RAW - HIGH OFF
POS 3: RAW - HIGH OFF
POS 4: RAW - HIGH OFF
POS 5: RAW - HIGH OFF
POS 6: RAW - LOW ON
Schematic Online Viewer
Resources
Project
This is the introduction Video of this product, simple demos, you can have a try.
Tech Support
Please do not hesitate to submit the issue into our forum.
